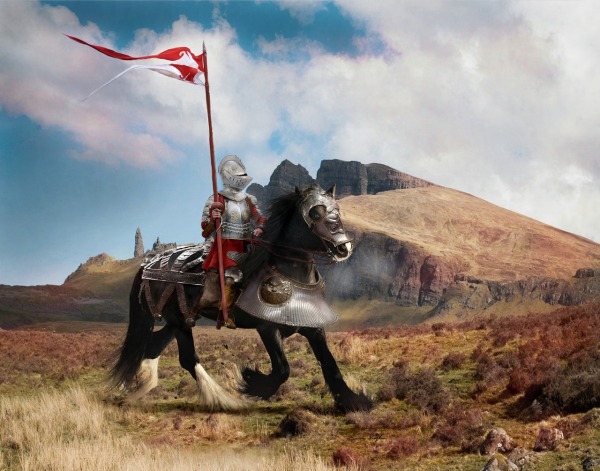
Upon your steed, you gallop into battle. Ogres, Orcs, and Goblins all stand in your way, but with a slight lean to your left and your shortsword in hand, you slash your foes and dash back to safety.
That sounds like a classic Dungeons and Dragons scene, right? Well, it turns out many of us don’t bother using a mount, let alone ride one into battle. When combat starts, some of us try to hide our horses because “if anyone dares touch Sir Galloper, this whole village will go up in flames!”
Well, just as you can be healed with a Cure Wounds spell, so can your mount. So, let’s see what we could do with an animal companion.
Contents:
Player’s Handbook Word-For-Word
- Mounting Costs Half Your Speed
- Your Mount Falls Prone Or Is Pushed Back
- The Height Of A Mount
- How Much Can A Mount Carry
- Reach While Mounted
- Controlling A Trained Mount
- Controlling An Untrained Or Independent Mount
- Druids As Mounts
Best Classes For Mounted Combat
Player’s Handbook Word-For-Word
You can find the information for mounted combat on page 198 of the Player’s Handbook. Below is a word-for-word reiteration from this section.
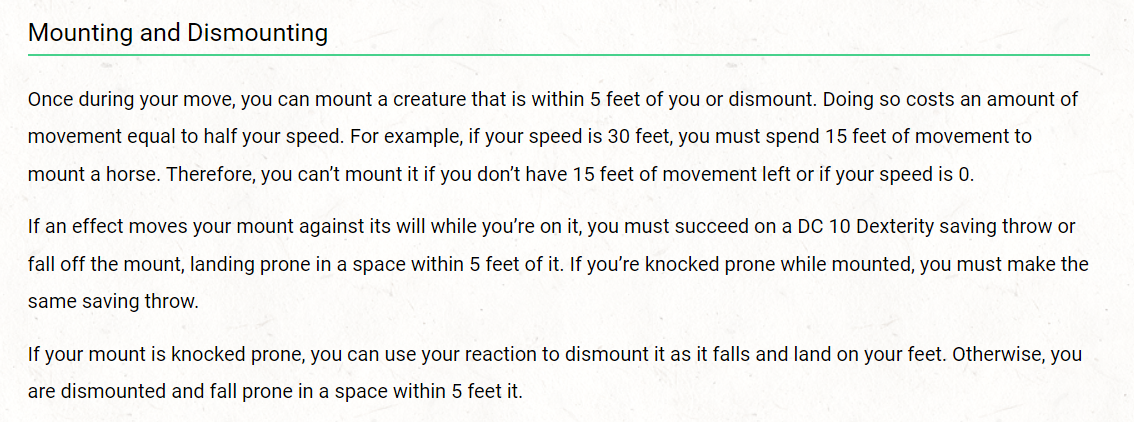
The first thing the manual explains is how to mount and dismount your steed.
The second is how to control your steed.
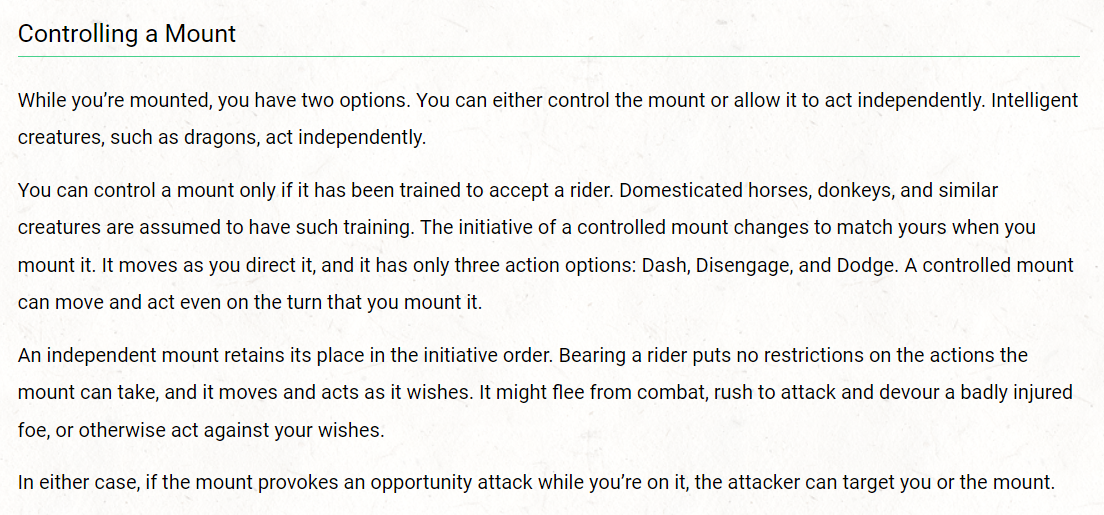
This is literally everything the handbook says about controlling your horse (or other creature). Using the information given and the rest of the manuals, we will explain what this means and how to use a mount in combat.
Player’s Handbook Broken Down
Although the information is concise, it doesn’t give us a lot of examples. We want to show you how you can use the information provided in a way that is completely within the rules of 5th Edition.
Mounting Costs Half Your Speed
The handbook says it will cost half your Speed to mount a creature. It doesn’t matter what your Speed is; a Goliath will take the same time to get on a horse as a Gnome.
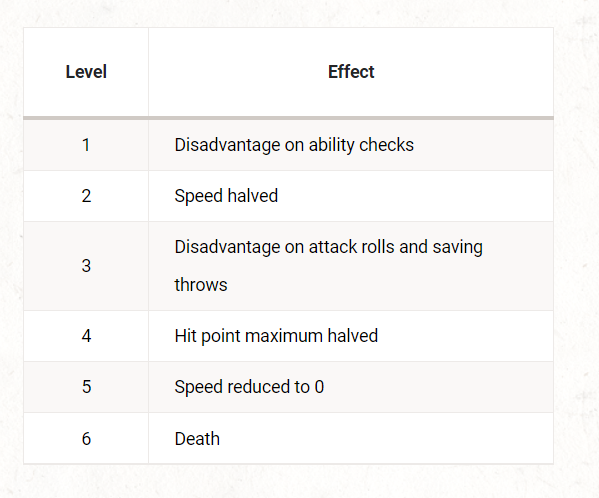
If you have two levels of Exhaustion, your Speed is halved. Therefore, a level two Exhausted player would take their whole movement to mount a creature. This is because your overall Speed is used for both scenarios.
In the same vein of thought, a character who has been “Hasted” (the spell Haste has been cast on them) still takes half their movement to mount a creature. This means their speed is doubled due to the spell, and then halved back to their original number when mounted.
The same goes for the Dash Action.
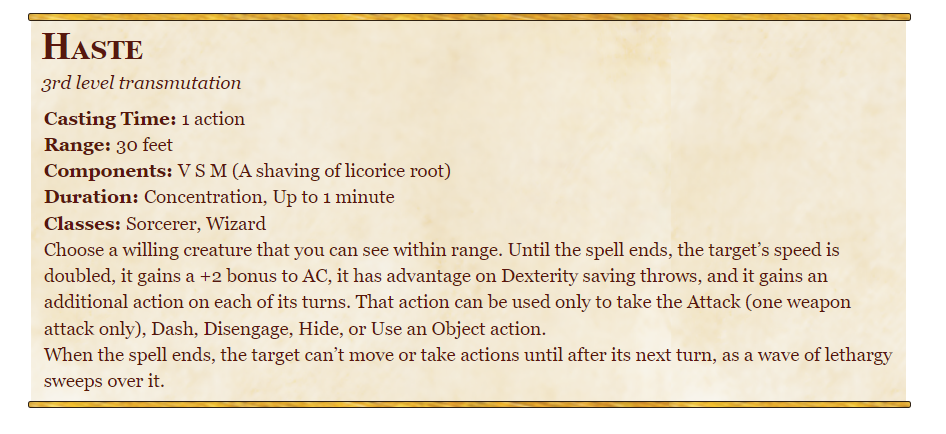
For example, Elves have 30 feet of Speed. When “Hasted” or Dashing, their Speed doubles to 60 feet. The Elf then mounts a horse, which drops their remaining movement back to 30 feet again.
At this point, it should be noted that once you’ve mounted your creature, they can take a turn in battle. This means you don’t need to save your movement, as your steed can move you.
Because of this, it might be more useful to see a character running to their mount.
Using the same example, this Elf has 30 feet of movement. They want to run away from an encounter, but their horse is 25ft away. Although they can run up to the creature, they will not be able to mount it on this turn.
Knowing this, the Elf Dashes, using up their action. They run 25ft toward the horse. They now have 35ft of movement left. With more than half of their extended Speed remaining, the Elf can mount the creature. The horse now has a turn to use their Action and their Movement. Using a Dash Action themselves, the horse can sprint away to safety.
In total, on this Player’s turn, they will have moved 140 feet and still have a Reaction, and Bonus Action left.
The Elf could also have run up to the horse and then cast Haste for the same effect. This is because the Player’s Speed (not used movement) is counted. As the overall Speed is doubled, they now have time to mount.
Your Mount Falls Prone Or Is Pushed Back
The next part of the handbook might sound contradictory, but there is a method to the madness.
The manual says that if your mount is pushed against its will (while you’re on it), you must make a DC10 Dexterity Saving Throw or be made Prone. The next statement says that if your mount is made Prone you can use a Reaction to dismount and land on your feet, or you will also be made Prone.
It stands to reason that if you can use a Reaction to dismount, you can also do this if you fail your Dexterity Saving Throw.
This means you can attempt the save, get a 5, then use your Reaction to stop yourself from falling Prone. Using your Reaction still means you are forced off your mount, but at least you have all of your movement.
Remember that if you are Prone, it will take you half your movement to stand up, and it takes another half to mount a creature.
Because of this, you might not want to use your Reaction. Instead you can save it, and use your full movement to stand and mount.

The handbook specifically states that if you fall off your mount, you land within 5 feet of the creature. To climb back on, you need to be within 5 feet. This means you will have full ability to simply climb back on.
If your mount is pushed back and knocked Prone at the same time, you can use your Reaction to jump off the creature as it gets pushed away from the encounter.
The Tidal Wave spell, for example, pushes creatures away regardless of if they succeed on their save. However, if someone fails, they are pushed away and knocked Prone.
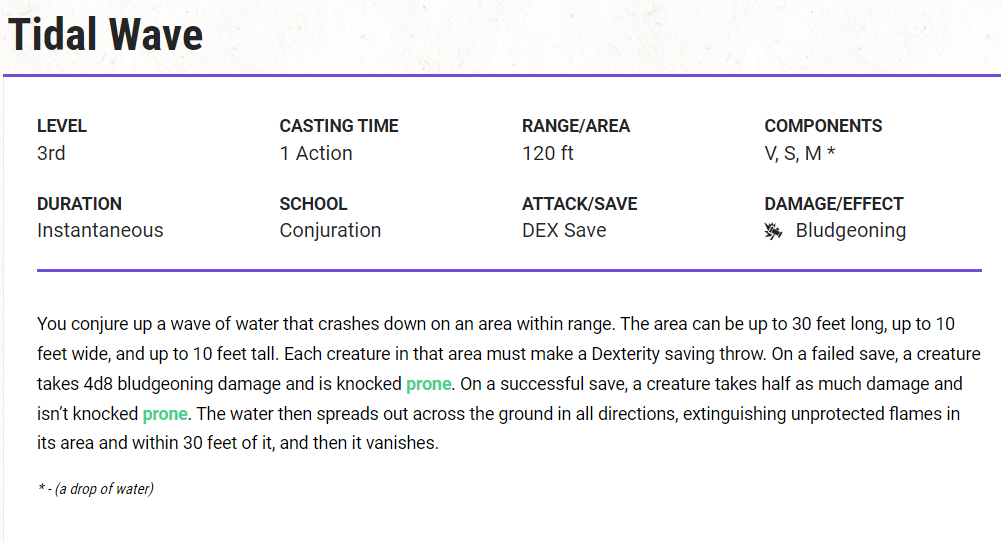
For example, if the Player Character is a Fighter (a melee class), they might want to stay close to the battle. The enemy casts Tidal Wave forcing the Fighter’s mount backward. Dice are rolled, and the mount fails their Dexterity Saving Throw. The Fighter decides that they want to stay in the heat of the battle, and so dismounts as a Reaction. This keeps them next to the enemy.
The Height Of A Mount
The eagle-eyed among you might have noticed that the Tidal Wave spell can reach up to 10 feet tall.
Depending on the height of the mount, our Fighter might have been forced to make the Saving Throw too.
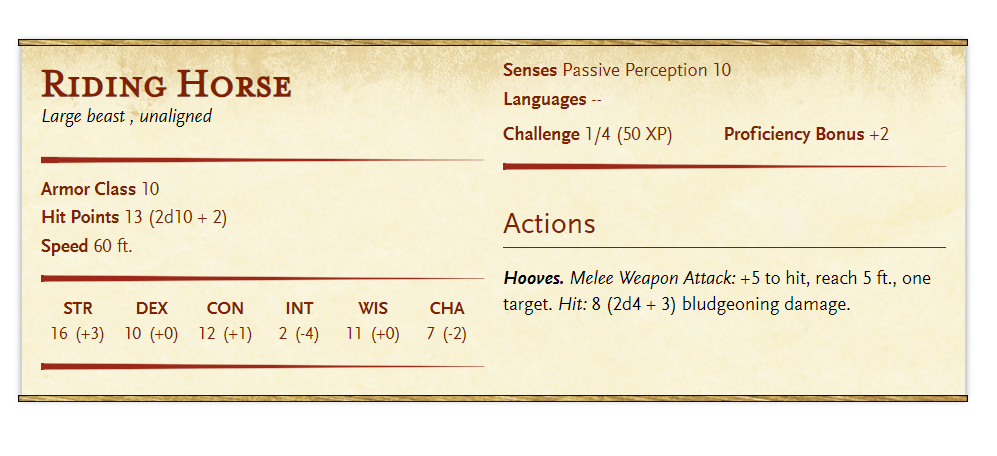
Let’s go with the standard Riding Horse again. This creature is considered Large. A Large creature is 10 feet tall and 10 feet wide.
The rules do not state whether we should use the full height of the creature or the mid-way height of a creature to determine where the rider sits.
I believe this is a Dungeon Master’s call. A horse, for example, would likely have their rider sit 5 feet above the ground. However, an Owlbear, which is also a Large creature, doesn’t have their back midway down their height. The Dungeon Master may decide that a rider of an Owlbear sits 10 feet above the ground.
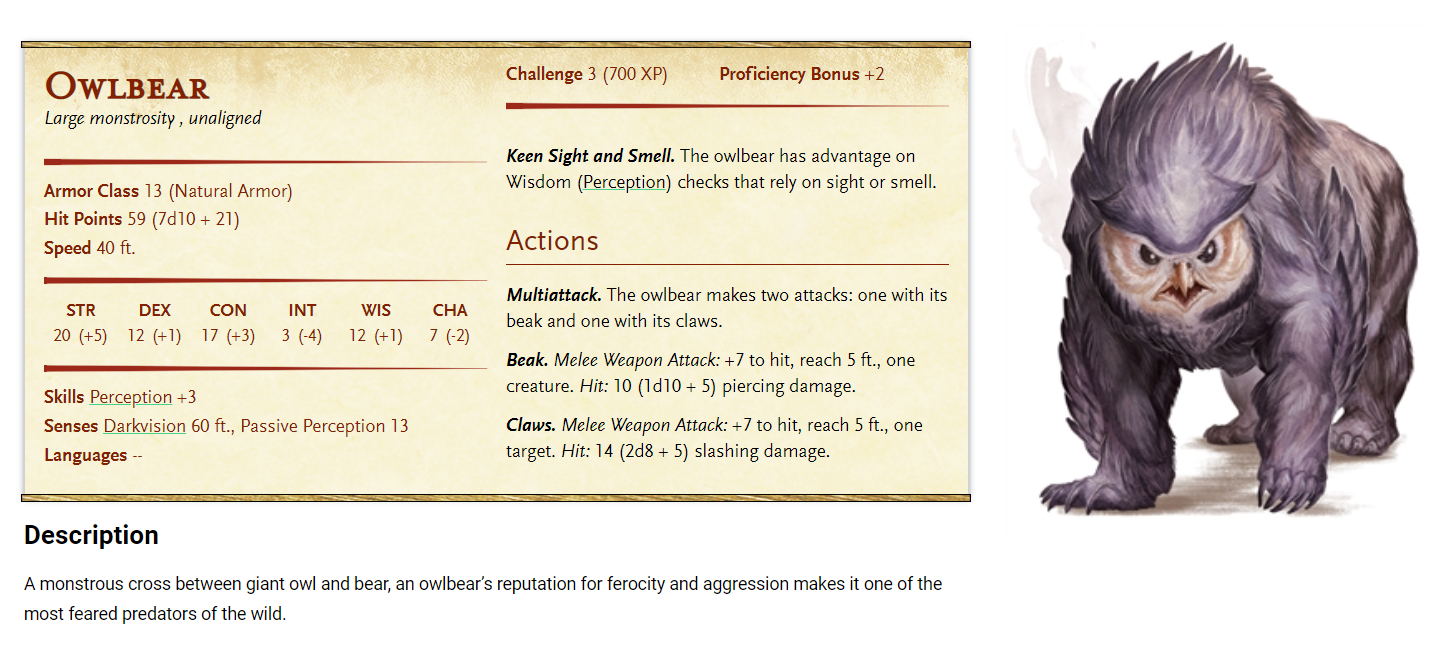
In the Tidal Wave example, a Fighter sitting on a Riding Horse would have to make their own Saving Throw. But, if they were mounted to an Owlbear, the Fighter would not be affected by the Tidal Wave spell and could use their Reaction to dismount once the spell was cast.
How Much Can The Mount Carry
All creatures, including Player Characters, can measure their carrying capacity in the same way.
Simply multiply the creature’s Strength Score by 15. This answer will be your carrying capacity in pounds.
Reach While Mounted
As we said before, the height of a rider while mounted is determined by the Dungeon Master. However, this matter should be discussed before playing the game, because most melee combat options are limited by a 5 foot reach.
If you are 10 feet in the air, riding an Owlbear, your 5 foot reach from a shortsword will not hit a 3 foot tall Halfling.
Because of this, a mounted melee fighter should own these weapons:
| Glaive | 1d10 Slashing Damage | Heavy, Reach, Two-Handed |
| Halberd | 1d10 Slashing Damage | Heavy, Reach, Two-Handed |
| Lance | 1d12 Piercing Damage | Reach, Special |
| Pike | 1d10 Piercing Damage | Heavy, Reach, Two-Handed |
| Whip | 1d4 Slashing Damage | Finesse, Reach |
All of these melee weapons have the Reach ability, which means that they can hit people 10 feet away.
The best melee weapon to use while mounted is the Lance. This is because you don’t need to use two hands to wield the Lance while you are mounted (but you do if you are not mounted).
The other weapons (not including the Whip) need two hands to wield with accuracy. At the Dungeon Master’s discretion, you will either forfeit your aim or your control over the mount when using these weapons.
The Dungeon Master might force you into rolling with disadvantage, or they could roll a 1d6 to see which direction your steed goes (1 and 6 means the mount follows original orders. 2, 3, 4 & 5 represent South, East, North, and West).
The Whip would be the best option for a mounted Rogue due to the Finesse property. Finesse weapons can be used with a Rogue’s Sneak Attack feature.
We will go into more detail about mounted Rogues later on.
Controlling A Trained Mount
The definition of a trained mount comes under two categories; classic creatures that can be trained (like a horse, a donkey, and a camel) and creatures that can be trained in the Dungeon Master’s world.
Both of these options are up to the Dungeon Master (DM). For example, if a Player sees a horse in the wild, the DM can say that the horse is wild so hasn’t been trained. This is a valid option and sticks with the settings.
A trained mount only has three options for their Action; this is regardless of their actual abilities.
Trained mounts can only Dash, Disengage, or Dodge. Dashing allows the mount to double their Speed for one round.
Disengaging allows the mount to move away from an enemy without getting hit with an Opportunity Attack. This Action only lasts for one round.
Dodge forces enemies into attacking with disadvantage when aimed at the mount or rider; it also gives the mount and rider advantage to all Dexterity Saving Throws.
When in battle, you should optimize this extra ability to Dodge. As you are riding the mount, you are connected to all of their movements. Just as the mount carries you long distances, they can also grant you a Dodge advantage.
However, if you plan on rushing through a crowd, and tell your mount to disengage, only they will be untouched by Opportunity Attacks. If your opponent can reach you, their Opportunity Attack can still strike.
Controlling An Untrained Or Independent Mount
Unlike a trained mount, an untrained or independent mount has their own initiative order.
The difference between untrained and independent comes down to intelligence.
An untrained mount is like a horse or an Owlbear that was never tamed. They run wild and may become distressed when you attempt to mount them. To them, it may feel like a grapple.
An independent mount understands what’s going on and can make their own judgments.
Having a rider does not hinder the mount, and these creatures can do anything they want in combat. This includes using their Attack Actions as normal and trying to kick you off their back.
If a mount tries to throw you off their back, this would be a contested Athletics Check (mount) against either an Athletics or Acrobatic Check (rider). Both make their roll, and the highest number succeeds.
Depending on the creature’s intelligence, the Dungeon Master could allow a Player try taming them. There is no official rule on how to train a mount. A Dungeon Master could create their own rules or use one made by online homebrewers like DragonCrown.
DragonCrown’s guide to training is simple and effective. They also have readjusted the whole mounted combat process! Check out their content for more options.
Druids As Mounts
A shapeshifter or wild-shaped druid can also become a mount. In this instance, they will be considered an intelligent, independent creature and have their own initiative count.
While they act as a mount, they can use their Creature actions as normal and are not encumbered by their rider as long as they can hold the rider’s weight.
Remember that the maximum any creature can carry in pounds (including Players) is their Strength Score multiplied by 15.
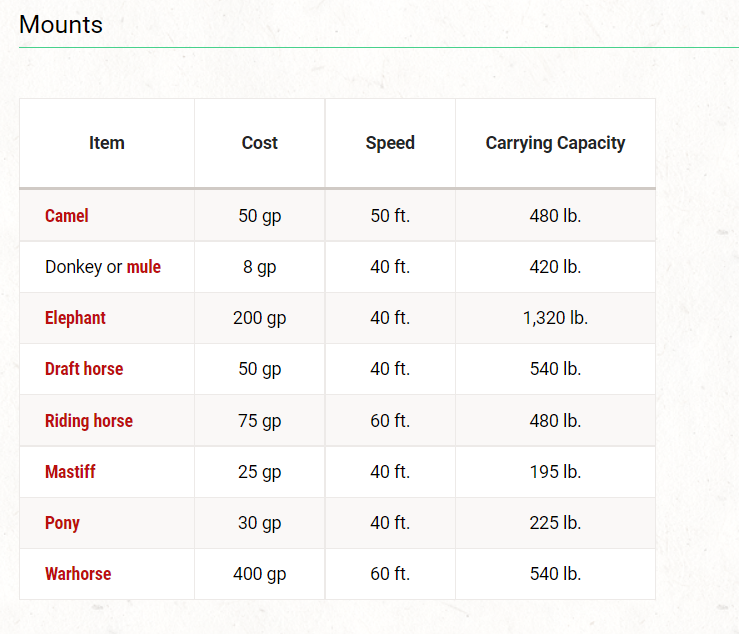
Classic Mounting Options
The best mounted option from the classic range is the Warhorse.
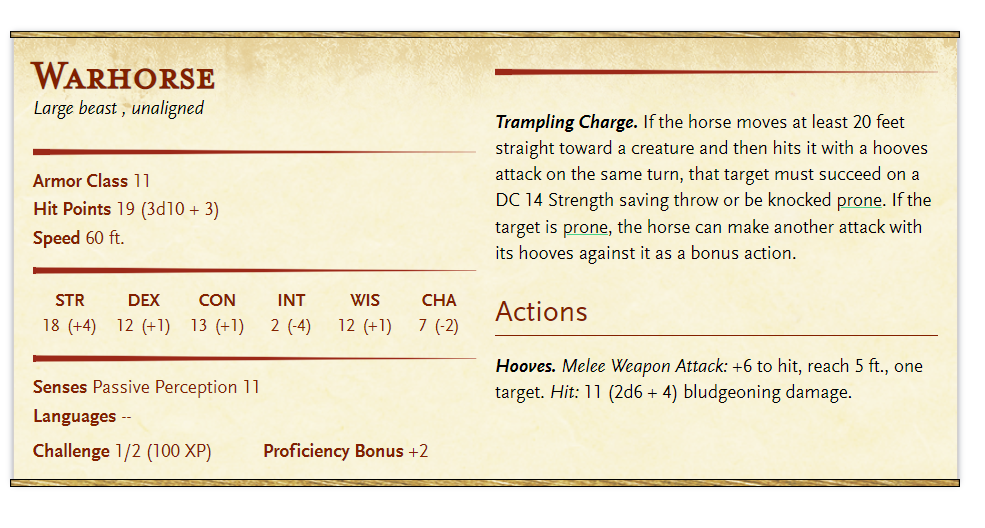
Out of all of the classic options, a Warhorse has the best Speed and the best Armor Class. However, if you want a tank for a mount, the Elephant has the biggest Hit Point count.

Small Player Characters, like Gnomes and Halflings, would benefit from a smaller steed, like a Mastiff or a Pony. Ponies have higher Hit Points, but Mastiffs have a better Armor Class.
There is nothing in the rules about Small Characters riding Large creatures, however visually they might prefer a mount that matches their size.
Although anything large enough could become a steed, this is the whole list of classic mounts:
If you want to ride something more unusual, try a homebrew creature or a monster. Elven Firefly’s Harrasaem mount is just one of the amazing creatures created by homebrew artists! Explore the community or create them yourself!
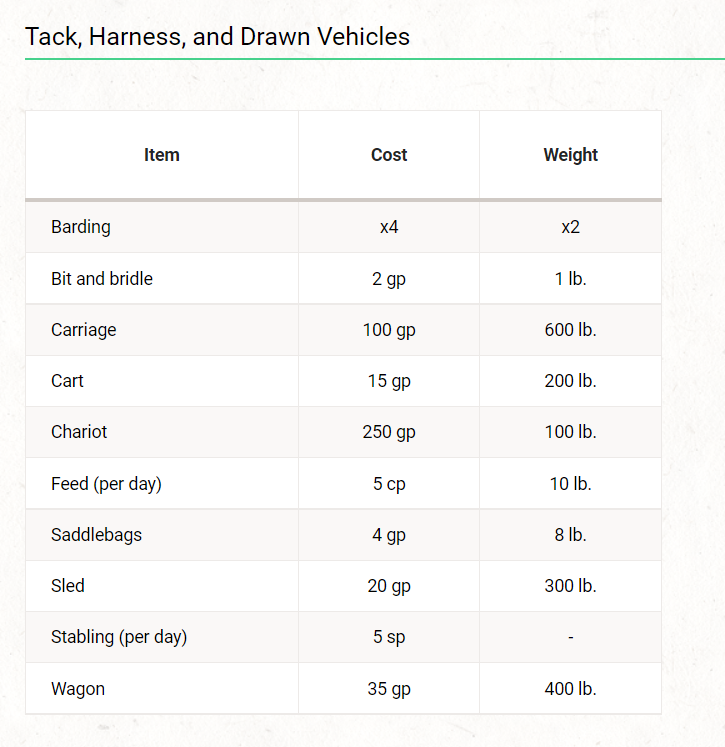
Back to the official guides – these are your Mount’s gear:
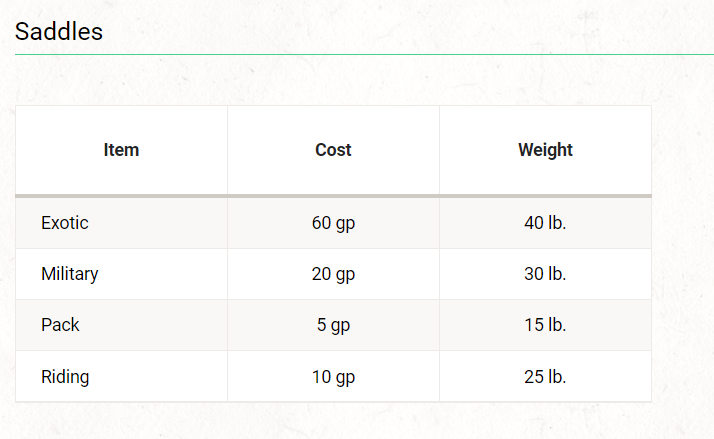
And here are the Saddles you can use:
Jousting
If your Players want to Joust, you can follow our homebrew setup for the encounter:
- Two players stand on opposite sides of an arena.
- Have both roll for Initiative, using the mount’s Dexterity Modifier.
- Whoever rolls the highest runs fastest. They get to Hit first.
- Roll to Hit and Roll for Damage as normal.
- If the damage (at any point) is half or more of the player’s total Hit Points, the player is knocked Prone and loses.
- After 5 rounds, the Player with the most Hits wins (if none is knocked Prone).
In this game, landing a Hit is more important than rolling high damage. However, if you produce enough damage, you can end the game early as your opponent is knocked off their mount.
Best Classes For Mounted Combat
All classes can be useful with a mount, but two, in particular, would benefit the most.
Cavalier Fighter
The first is the Cavalier Fighter. This Fighter is designed to battle on the back of a mount.
At 3rd level, they have advantage on Saving Throws to stay on their steed, and it only costs them 5 feet of movement to mount their ride.
At 7th level, the Warding Maneuver allows them to use their Reaction to increase their mounts Armor Class. This also works on the Player and their allies within 5 feet.
And at 15th level, they gain the charging spirit of their mount and can knock someone Prone, after charging 10 feet in a straight line. They can do this whether they are mounted or not.
The Cavalier Fighter is built for a steed and is the perfect Class for mounted combat.
Soulknife Rogue
The second best Subclass for mounted combat is the Soulknife Rouge.
In fact, all Rogues will benefit from riding a steed due to their Sneak Attack feature.
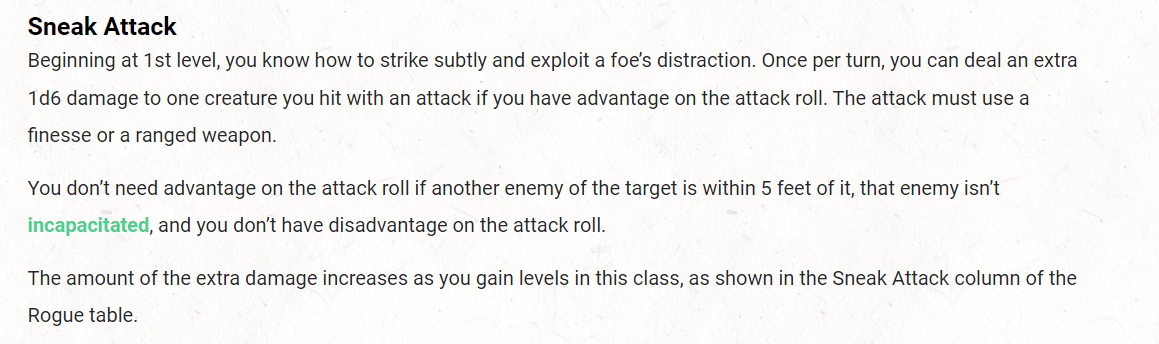
For the Sneak Attack feature to activate, the Player Character needs to have advantage or be within 5 feet of their target’s enemy.
If the mount attacks the target outright, they will be considered an enemy. However, to most Dungeon Master’s, being an active member of the party will be enough to count as the target’s enemy.
This means that the Rogue will automatically get to use their Steak Attack while mounted.
If they use a Whip, as we said before, they will be able to reach enemies 10 ft away and still manage to use their Sneak Attack due to the finesse weapon. Of course, that is only true if an enemy of the target is within 5 feet.
However, the Soulknife Rouge can take this one step further.
At 3rd level, a Soulknife Rouge can pull psionic power from their soul to create a finesse or thrown weapon, just like a Dagger. This means it can be used for Sneak Attack.
This Soul Blade does 1d6 damage, which is more than a Dagger’s 1d4 or a Whips 1d4. And unlike a Dagger, it will also return back to the Player.
The last thing that makes it impressive is its 60 foot range.
Normally Rogues are in the thick of the battle, but with a Soul Blade and a mount, a Soulknife Rogue can act more defensively. They can ride into battle, use a Sneak Attack on their target using the Soul Blade. Next their steed can use Dodge and run away. Then the Rogue can use their Two-Weapon Fighting feat to hit with a second Soul Blade from 60 feet away.
Sneak Attack can only be used once per round, so getting out of the enemy’s melee range after hitting is a smart tactic. They can still use their Bonus Action for use their Two-Weapon Fighting feat, but be at a safe distance.
Granted, the second attack is only 1d4, but this Rogue keeps their weapon, has disadvantaged any enemy Opportunity Attacks, and always has Sneak Attack.
Mounted Combatant Feat
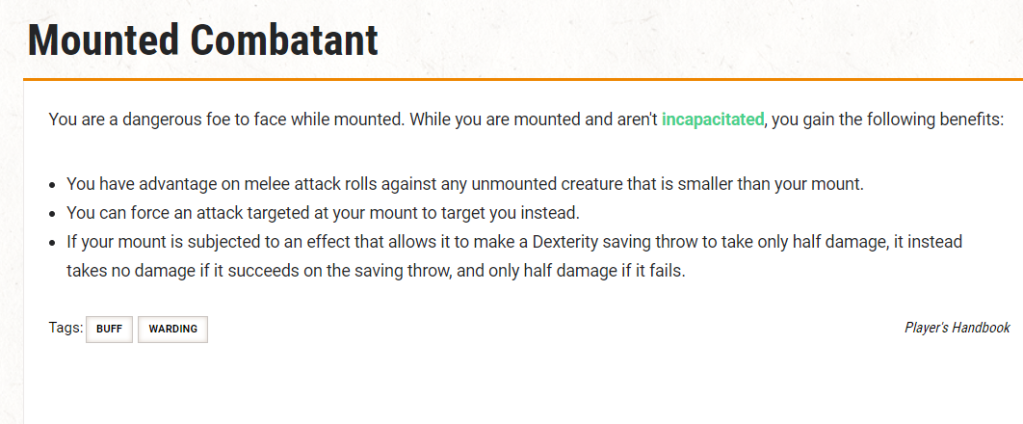
The Mounted Combatant feat can be found on page 168 of the Player’s Handbook.
No matter what class you pick, if you plan on riding a mount often, choose this feat. This is especially true if you are a Rogue.
Rogues always want advantage when attacking, so they can use their Sneak Attack. If your Dungeon Master doesn’t agree that your mount is your target’s enemy, then this feat can grant you a constant advantage instead. Just make sure your mount is the biggest in battle.
Summary
Apart from the jousting portion, everything in this article has used official rules from Dungeons and Dragons manuals.
Now you know how to use mounts in combat, which weapons to use, and understand mount heights.
The biggest confusion that most Dungeon Master’s face is around the trained mount’s actions. Remember, a trained mount can only use Dodge, Disengage, and Dash. The three Ds.
And if you Player Characters want to mount an unexpected creature, the creature can hold 15 times their Strength Score. It will usually be fine unless the mount is small.
Bookmark this page for future reference, as you’ll never know what mounted combat could crop up in your sessions!
Feature image by kudybadorota